The strange days of 2020 sprung me into a nostalgy-filled run through the AD&D Gold Box games with a stats-fairly-rolled, non-cheating group of adventurers. Here’s a recollection of how I did the unthinkable – winning the “impossible battle” of the 2nd game of the series, Curse of the Azure Bonds – without the Dust of Disappearance. I understand if that does not ring a bell for you.

“Being a Saurial paladin, it’s my duty to teach those who designed her hauberk a thing or two”
– Dragonbait
To gamers born in the 70s and 80s, the AD&D Gold Box series is a game equivalent of Star Wars (IV, V, VI) or the Lord of the Rings (the book).
Kicking off with Pool of Radiance in 1988, continuing with the Curse of the Azure Bonds in 1989, and ending with some 20 games in total, the series offers hundreds – ok, thousands of hours of gameplay.
By today’s standards, most of that gameplay can be considered – putting it politely – tedious. You just can’t kill em all using in-game-purchases which pappa betalar. But at the time they appeared, the gold box series games were – in a good way – revolutionary in many aspects.
The games are also quite difficult. At least to those not what well versed in the Advanced Dungeons and Dragons 2nd edition’s intricate set of rules, which the games were impressively orthodox in following.
And even to those versed in the art, there were some encounters in the games that posed real challenges. Probably the most well-known – and arguably, the most difficult of all of them – was the optional fight against the Mulmaster Beholder Corps in the Tower of Onyx in Curse of the Azure Bonds. Yes, it is more difficult than Dave’s Challenges in the later games.
Before you read on, a fair warning – I’ve also ascended in Nethack – but only once, and that was in the mid-90’s right before sex, drugs and software engineering diverted me off course for several decades.
The Mulmaster Beholder Corps

Being a tongue-in-cheek encounter by the game designers, in the fight your party of up to six characters are facing a total of 14 beholders, 10 dark elf lords, 10 high priests, and 10 rakshasas.
As comparison, the boss battles elsewhere in the game feature for example sport a single beholder (with a host of lackeys of course), a single dark elf lord, and, well, way less high priests and rakshasas than those thrown into this battle. Oh, there’s also the host of black dragons at the top of a tower, which I out of luck sweeped through at a first try this time around.
The party
Here’s the party I went into the battle with:

The characters are all half-elven for two reasons. First, this allows the use of haste whenever needed; no dying of old age (that actually happens with humans, I tested it back in the 90’s). Also, half-elves are the only class which can be a triple-multiclass fighter/cleric/mage.
I did not use elven folk as they cannot be raised from the dead; I actually raise dead characters as needed so that they drop a point of constitution and lose some hit points – again, making things a bit more balanced for the monsters’ sake.
Note, that I did cheat here a bit. Using Gold Box Companion I disregarded the level-up limitations of half-elves (being 5 cleric, and 8 for fighters and mages). However, if I had known that blessed crossbow bolts insta-kill Rakshasas, that might offset the lower levels. I guess I’ll have to try that at another time.
The monsters rejoice for the party has been destroyed
A typical winning strategy in these games is to decimate the enemy with enough well-placed fireballs and stinking clouds. However, in this battle, both the beholders and rakshasas are completely immune to magic, and the dark elf lords, besides having quite good saving throws, simply shrug off 50% the spells thrown at them.
Now, suppose that I’d send my party (see below) with the usual buffs into the encounter?

Here’s a short video screen capture of what happens when you approach the fight with the typical strategy – even with all the buffs (like bless, prayer, haste, whatnot).
This was the situation after the first combat round: my party has been pretty much decimated, with not even a single enemy killed.
The “supposed” way to win this battle is to use a special item a that can be found early on in the game: the Dust of Disappearance. It renders the party with improved invisibility for the duration of the battle: in other words, the invisibility will not disappear upon action such as attacking or casting spells. Thus, the enemies simply stand still and wait to be hacked to bits and pieces one by one. Even the rakshasas and dark elf lords, who otherwise see invisible, will not see the characters.
And even with the Dust, the battle will be long and requires careful playing, as in the melee range the dark elf lords will deal hard blows at your invisible characters with their +5 long swords and two attacks per round.
This time around (and some 30 years after my first tries), I decided to give a go at winning the battle without the dust of disappearance. I also had handicapped myself by fairly rolling the characters’ stats (in the game, you can modify them all to the maximum upon character creation).
This handicapping was quite intentional, as by having some 35 years of experience in mastering AD&D rules, I wanted to try my best to keep the games challenging. Being overpowered is so totally boring.
Other attempts
There are folks on the Internet who claim to have won the battle without the Dust of Disappearance. However, looking at their gameplay videos, it can be discerned that various things which I consider cheating have been employed. To name a few, the characters’ hit points have been edited to 200+, the best items have been duplicated to all the characters, and the characters’ stats have been modified to the maximum.
To make it a fair fight (and being a bit of a perfectionist), I decided to forego such shortcuts.
Know your enemy
I spent roughly a week of calendar time trying out different tactics and getting to understand the enemy. This is what I learned.
Beholders

These 75hp buggers are totally immune to magic, the only thing that can hurt them is physical damage. With an AC 0, they’re fairly easy to hit, and take damage from non-magical weapons.
The most important thing to know is that at range 7 and beyond, the dreaded beholders are totally harmless. At range 4-6, they cast sleep – which can’t do anything for your above level 4 characters – fear as well as slow, which can be quite disaster for your tactics, and cause serious wounds.
At range three, the real fun begins: in a single round, a single beholder can cast disintegration, flesh to stone and (perhaps, not sure of this) slay living rays at you, and unless you’re really lucky with your saving throws, that’s game over for that character, at least for the ongoing fight.
However, beholders cannot target invisible or blinked-out characters. Also, beyond a range of 6, they can’t do anything except move towards you with 3 steps per round. And they can move after they cast their magic, but not the other way around.
This cast-before-move-but-not-move-then-cast goes for all the critters in the game as well – here, the high priests and the rakshasas. I read it online that the computer AI learned to do that only in Pools of Darkness (don’t know how that was for the Krynn or Savage Frontier series)
Rakshasas

Rakshasas also immune to all magic, but with 35 hit points and an AC of -4, it is quite possible to put one down in a single combat round with a concentrated attack. However, you need a magical weapon to do damage, so you’ll be needing the +1 arrows that you can purchase from the Dagger Falls magic shop. They’re also fast, with a movement of 15.
What is problematic, however, is that Rakshasas can see and target invisible characters and cast lightning bolts at them (however, the Dust of Disappearance would for some reason prevent this as well). While they cannot target blinked-out characters, blinked-out characters will take damage from a lightning bolt thrown at somebody else.
The range that a lightning bolt can be cast to is max 10 squares. This means that at the start of the combat, all of the rakshasas can target at least one of your characters. So if you don’t take steps back, you’ll have a maximum of 10 bolts of level 7 (that’s 7d6 damage, half if you make your save) thrown at you.
So, suppose that you successfully roll half of your saving throws, that’s 5 x 7d6 / 2 + 5 x 7d6 = some 150 hp of damage in total per round, and since a single lightning bolt can damage multiple characters and bounce back from the walls to deal more damage…
There are a couple of items in the game that halve the damage from electricity, but no spells to counter electrical damage.
The conclusion is that if you stay within a 10 square range, the rakshasas alone could kill your entire party in the first round.
Dark elf lords

These badasses have a movement of 24, an AC of -7, 108 hit points, strike twice per round with their +5 long swords and have a THAC0 low enough to hit your characters often enough to make you cry. With their infrared vision they can see invisible characters well enough to rush at them.
With a head-to-head, blow-for-blow physical combat with all the buffs for your party, you’d be sure to lose to a group of 10 dark elf lords.
High priests

Last and the least, the 60-hp high priests. Sure, they cast hold person and slay living, but as they are susceptible to fireballs, my party could in principle obliterate them in some 3 rounds without taking anything back except an occasional swing from a +2 flail.
One could probably even remove from the high priests from the fight altogether without affecting the overall difficulty that much.
Throwing caution to the wind
The bigger picture for the fight is shown in the post-it below:

As you’ve probably guessed at this point, head-to-head tactics will not work in this one. Luckily, there are two places in the battlefield where you can escape the onslaught. These are shown in the picture below:

In the northwest, there is a corridor which after a while turns around the corner to the east. And in the south, there is a long corridor to the east with a 4 square wide tunnel.
The monsters’ pathfinding AI will try to approach you along a straight line. So, if your characters are behind a wall, they’ll just get stuck to dancing on the other side and will not go out of their way to circle around to get at you. I chose the south tunnel as my refuge, but in principle, the northwest corridor could also work.
The problem is that from behind a wall you can’t get to the monsters either, so something special was needed.
Note: I discovered that the game has a timeout for fights; after enough rounds have passed – I don’t know how many, it could be the max number from the 8-bit game engine, in other words 256 minus one – that is at least the maximum for character hit points or arrows in a single stack), the fight will end and the computer will determine that you won.
So basically, you could just run to the tunnel and wait until you simply win. While that of course would not suffice for me, I “discovered” the timeout in one of my lengthy tries during the passion week… so that’s added difficulty, try to kill em all without hitting the timeout!
Pre-combat preparations and the first round
In preparation for the fight, I stacked up on +1 arrows (255 for each character) and mage scrolls of blink, haste and lightning bolt – you can get these from the magic shop. Not having to leave space for blink or haste, you can memorize lots of fireballs…
The #1 crucial question is to how to get past the first round to the safety of the tunnel. With luck and lots of tries, I managed at best to get 5 characters out of 6 to survive the first round by immediately heading towards safety.
But then I remembered the spell Invisibility 10’. So, before the fight I cast no other buffs, just that, and then head towards the tunnel. You might get struck by a dark elf lord or two, and if you’re unlucky, a rakshasa might throw a lightning bolt at you, but you’ll survive.
Once you are behind the wall delay until all the monsters have moved. At that point, cast all the buffs – haste, bless, prayer, and the like. You might also want cast blinks, but that’s less important at this point.
The bombing runs
So it’s round #2. You’re behind the wall, all buffed. The monsters can’t get at you, and you can’t get at them.
Move eastward so that the monsters AI will move them away from the tunnel entrance. Especially the faster dark elf lords and the rakshasas will get packed into a corner at the southeast of the room they start in, like this:

Now it’s round #3, and the time for bombing rounds! Delay until all the monsters have moved, and then move out of the tunnel to face the monsters. The bombing rounds, I think, were for me the key to winning this battle.
Have 5 party members to cast fireballs (prioritise targeting as many of the dark elfs as possible, any additional high priests in the area are bonus), and the 6th party member to cast invisibility 10’ to end the round, so you’ll arrive to round #4 all invisible.
When you get your turn on round #4, move back to the tunnel, stay near the entrance, and delay until all the monsters have moved. A couple of dark elves might rush at you (they see invisible), so be sure to have the character with the best armor class and a wand of fireballs stay a couple of steps from the rest of the party there to take these blows; this character should also have the ring of invisibility, protection from evil, and the best AC of your group. Blink and a minor globe of invulnerability to protect against the lightning bolts will not hurt either (though most of the rakshasas are beyond their range at this point).
If you have blink in place, that character should have the wand of fireballs and use that as soon as he/she get’s the chance; if you cast a fireball as a spell, you are vulnerable to the beholders during the casting time.

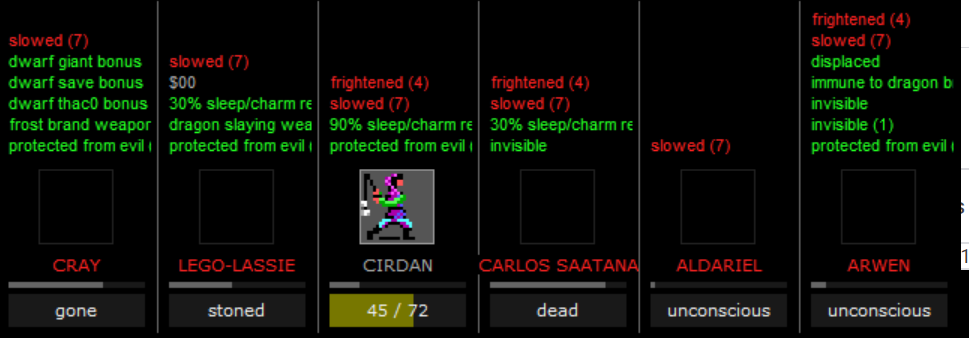
Arwen is blocking the dark elves from going after the other characters
At the end of the round, the rest of the group will move back to the open, cast again 5 fireballs, and top that off with another invisibility 10’.
The main goal of these bombing runs will be to weaken the dark elf lords so they can be beaten in melee without a lengthy blow-for-blow. Sure, they will shrug off 50% of each fireball due to their magic resistance, but some will get through. With 5 10-level fireballs, that’s 5 * 10d6 = 5 * 35 (on the average) = 175 hp of damage, halve that with the magic resistance ~ 90hp, reduce that with ~50% successful saving throws… on the average, the dark elves will take some 45hp of damage per bombing round. With three bombing runs, a third will be killed outright, another third will get some serious damage, and a couple will escape damage altogether.
As a side effect, all the high priests will die as well.
These bombing runs can can be repeated as many times as you have invisibility 10’ at your disposal. Of course, each invisibility 10’ reduces your fireball capacity by one, as they both are 3rd level mage spells. I used three of them.
Eliminating the remaining dark elves
Stay near the beginning of the tunnel with your blinking, invisibility ring-equipped character up front. If there are dark elves in melee range, concentrate attacks on them. If not, have the invisibility ring -character use the wand of fireballs on the dark elves within range. Feel free to have the rest throw in all mass area spells (fireballs, ice storms, wands, necklace of missiles and so on) for extra damage.
Some rakshasas will also wander to face you, and if many come, it’s best to have all but the invisible, blinking character back way east of the tunnel to stay out of the lightning bolts’ range. The frontline person can cast a minor globe of invulnerability to have the lightning bolts that get cast be in vain. When in melee, the rakshasas will not cast lightning bolts at all.
Keep focusing on the dark elves, ignore the rakshasas unless there are no dark elves to target at.
Killing off the remaining rakshasas
Once all dark elves are gone, there will probably still be some rakshasas left. Lure them into the tunnel with a character who has a minor globe of invulnerability on. Kill them off with ranged weapons and melee attacks.
Using the beholders as target practice
Once all the rakshasas are gone, it’s time to get to the beholders. One or two might have wandered into the tunnel earlier (you’ll actually see I had a bit of trouble with that in the video during the dark elf killing stage) and gotten killed, but most will be intact.
Haste your characters, and move them into the open. Use ranged weapons, and kill the beholders one by one. Delay until the end of the round before shooting to make sure you always are at least 7 steps away when the beholders get their turn to move; your superior movement will make this entirely possible. Repeat until all of the beholders are dead.
From the videos below you’ll see I had a bit of fumbles while killing the beholders, those cost the life of Lego-Lassie.
Pics or didn’t happen!
Here’s a two-and-half-hour video of the entire fight, shot on the Friday night of 15th of May, 2020. Takes a bit of time to download from google drive, be patient.
To make the viewing (and downloading) experience a bit more tolerable, I edited it down to show all of the monsters’ deaths and some highlights; that video is only some 6 minutes in length.
Unfortunately, Lego-Lassie got killed. Well, it’s Raise Dead time again.

You can kill a rakshasa instantly by hitting it with a blessed crossbow bolt.
Also, backstabbing with thieves can take out one thing per turn – a backstab with a magic longsword and decent strength does over 100 damage by that point.
LikeLike
Wow, did not know the blessed crossbow bolt thing! Where in the game you can get those?
LikeLike
Hey, something doesn’t sound right. Half-elves have the following maximum levels: 5 for cleric, 8 for fighter and 8 for mage. Your characters are well above these limits. This would give them longer spell durations, more HP, better Thac0 etc.
LikeLike
You’re right. I disregarded the level limitations using the gold box companion: https://gbc.zorbus.net/
So I did cheat there. Have to add that to the post itself. Thanks! I think that 5-8-8 levels might be enough to pull off the same trick, though. I only later (after this) learned that Rakshasas get instakilled from silver arrows, so that the lower levels might be compensated by that. The most important things are the bombing rounds, I think.
LikeLike
I’m massively impressed!! That was NEVER an easy fight. Even with the dust.
LikeLike